It's that time of year again, Eurogamer time.
And that means prop building for a costume, but just like last years Portal gun (build-blog here
http://landstalker-portalgun.blogspot.co.uk/ ) this gun was for a friend too. Next year I really must try to cosplay myself.
The image above shows a commercially available replica that costs megapounds and doesn't have the rotate function that mine does. My build was a cross between this and the game one. The game one isn't fully visible and there aren't many official game blueprint images so I used a little artistic licence.
After gathering loads of resource images I set about finding raw materials. I already have a box of bits and bobs, plastic sheets etc. (I collect stuff all the time) but I really wanted a starting point to build from. After loading an image of the plasma cutter to my phone I visited shop after shop and many car boot sales looking for the right thing. I eventually foung this, it's a Playstation Move add-on and aside from the recesses on the handle the overall profile was a close enough match.
I took some measurements of the gun...
...and some of my printouts...
...and I ended up with a 1:1 scale image to take measurements from.
As I planned on making the front section of the gun rotate through
90° (like the one in the game) I needed a motor. I have a box of motors, switches, relays collected from old HiFi's, VCRs, toys etc so I wired up a few to find the right one. Most were either too small/under powered or required to big a voltage.
Then I took aprt an old (and cheap) battery driver and found the thing I was after. A 4.5v motor with a gearbox attached to the front to give enough torque to turn the front section of the gun. Thanks Lady Luck.
A quick bench test involving the motor...
...and a DPDT switch (wiring fun...not) I knew that I had the right set up.
As you can see I ended up only keeping the handle and small section of the gun structure for this build. I then cut some plastic sheet (the green stuff) to block out the main shape.
The left side glued into place.
Here you can see that I've glued both side panels on and made the bottom rail too.
This was made from 2 sheets of plastic, doubled up and glued together.
I profiled the back of the piece to blend in to the handle.
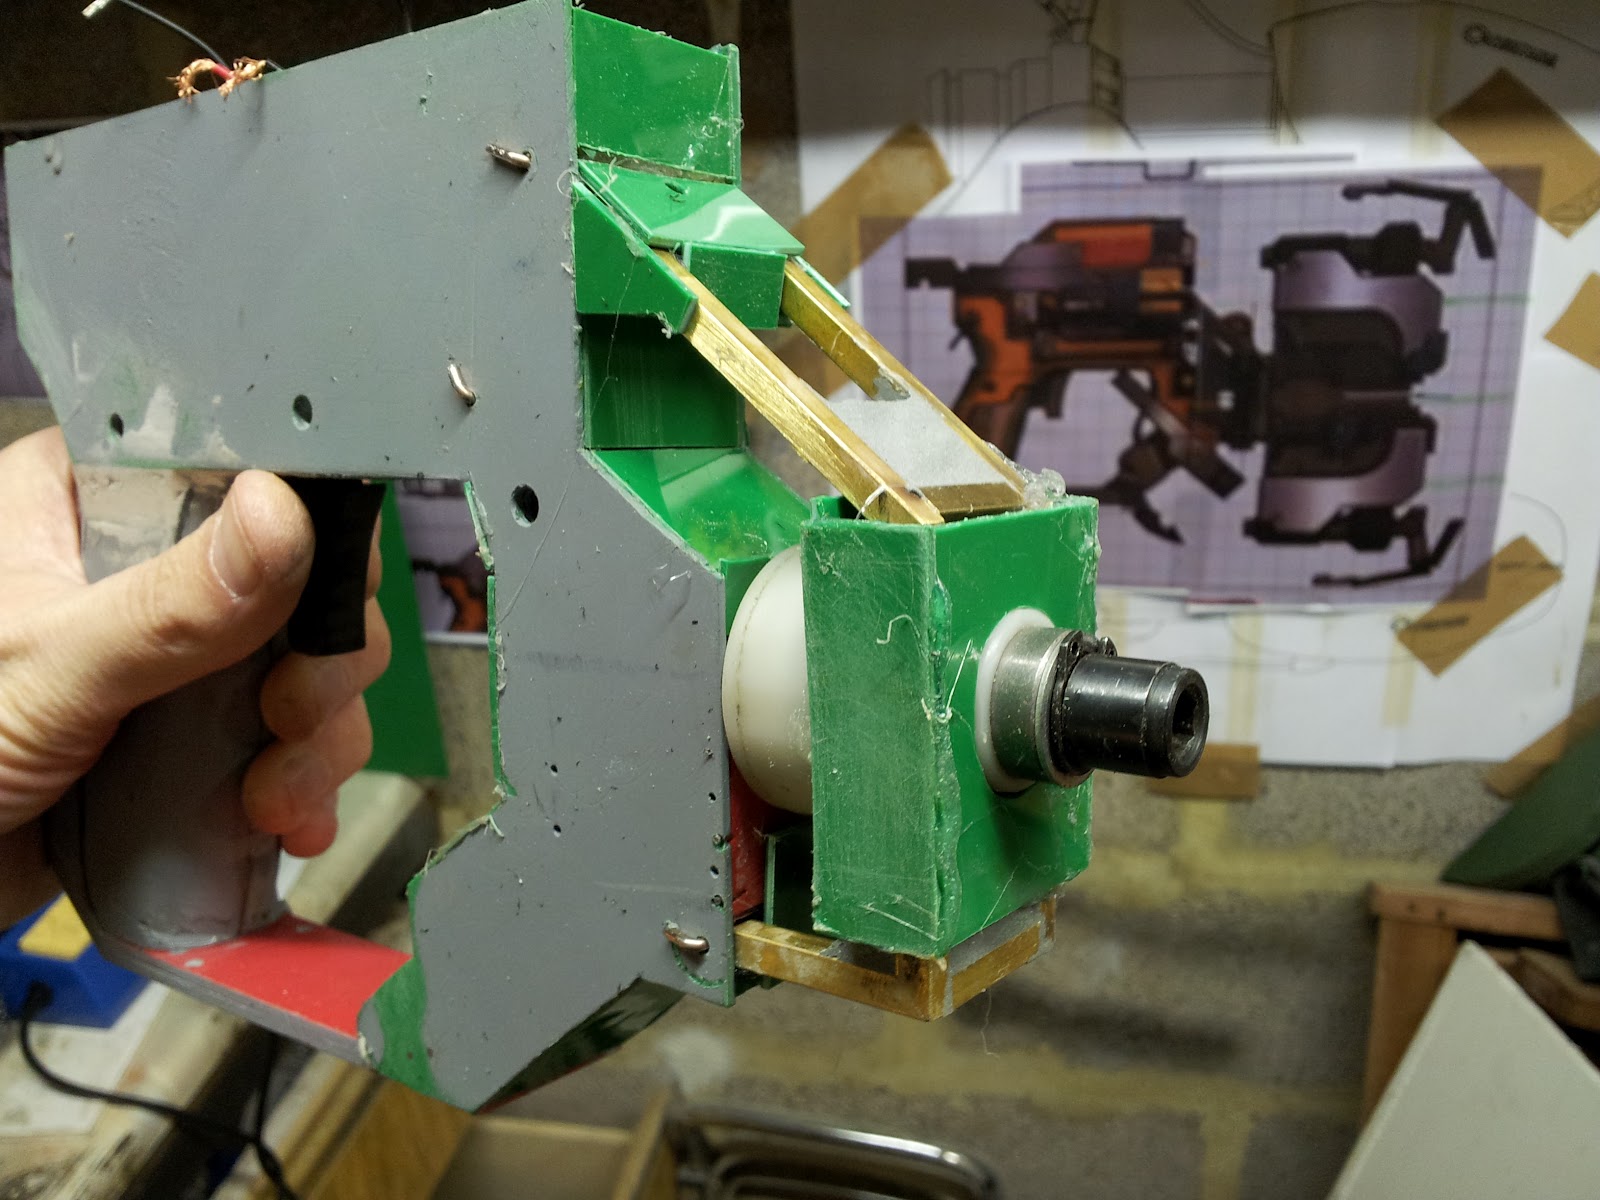
Next I needed to build a frame to hold the motor. This is actually on the ingame gun but it was functional on my build too as a mount for the motor/gearbox. I made it from 5mm box section brass tube.
Everything had to be checked for fit along the way. There wasn't even a millimeter to spare with this motor and I was already using all of my artistic licence to get it within the overall gun dimensions.
After a very unsuccessful soldering trial (the pieces just wouldn't weld together, at least not with my skill level) I resorted to a very basic method of fixing - each of the joints had several pieces of bent wire inserted and then each joint filled with car body filler. This created a 'reinforced concrete' style fixing at each joint.
Here are the two side frames. Aplogies for the rotated pics by the way, not sure why this has happened. just turn your laptop/phone on the side. Problem solved.
At work I used some leftover resin (the grey stuff) to fill in those recesses on the handels.
Although my previous welding failed I decided to give it another go to join the side sections together. I used a hammer to hold pieces in place and soldered away.
A test fit of all the pieces held together with tape.
Looking about right for size and shape.
You can see how tight for space the motor was.
This is a 'Laysooor' as Dr. Evil would say.
The ingame gun has blue lasers but they are expensive and VERY dangerous, certainly not cosplay safe where there are other people around. So I bought 3x 5mw green lasers and set about stripping the casing off.
Pliers please nurse.
As I had removed the case which acted as the battery compartment and contacts I had to solder on wires to the positive and negative terminals so that I could get power to the lasers.
To trigger the lasers and LEDs in the front of the gun I fitted a microswitch behind the trigger.
The existing trigger had completely the wrong shape so I made a new one. This kept falling apart and off and a new, stronger one was needed.
This new one was cut from one piece of thick plastic.
And here it is fitted into the trigger guide.
And in the gun.
A quick coat of primer gives a better idea of how things are progressing.
I started work on the front section, the basis of which was a simple box.
I started using plastic to block out the gun to give it a more solid feel.
It now looks more chunky.
The front section has to rotate through
90° only so I fitted 2x sub-microswitches. When the front rotates it will hit the switch and cut the power to the motor. Then when you push the switch the other way it goes 90° and hits the other switch to stop it. This caused a headache in the wiring area trying to get the power cut at the right points.
Next I used more plastic sheet to start adding the details to the sides. I also used wire to add some of the details. The black pen on the handle shows where I need to cut a groove.
This is a paper template for the left side panel taped to the plastic ready for cutting.
Here it is fixed in place along with some metal details and small pieces of plastic rod to simulate rivets.
This is the start of the rotating part. The wires are what will power the lasers and LEDs.
This is the front section getting its details added. First up is several flat pieces.
Two tube sections are on the top and bottom of the front piece so I used various diameter plastic tubes to build them.
These still need some car body filler applied to create some bevels on the pieces.
Testing them for size. I got hold of a torch (been looking for the right style one for a while) and that is checked for size too.
Time to make the tops section. Although one of the early photos shows the battery on the handle it turned out that it wouldn't quite fit. As the battery needed to be replaceable I decided to put the battery in the top so this top piece had to be removable.
Once this screw is removed the top section slides forward and lifts off to give access.
These L-shaped pieces lock under the ones glued to the inside of the body section and keep it held firmly in place. Crude but effective.
Next came the details on the top section. The large orange part was created using a sweetner tube.I also added more panels to match the game version.
These panels continue around the back and half way down the right side of the gun and have rivet details too. You can see the square hole where the switch will go to make the front rotate. The holes in the side are for the metal D-ring to hang the gun from a belt.
It's hard to see from the game what is actually on the top of the gun so I just added what felt/looked right. This piece is made from the inside mechanism from the sweetners, straws and some old wire.
A side view. The wires on the right were eventually put throught the top plate too.
With all of the components completed it was time to paint the gun. First I used Bondo to fill any gaps, cracks and holes and also used it to blend all of the details together. Then a coat of primer and more filler and sanding where necessary.
Same for the pieces to make up the front section too.
Then after painting the silver sections I masked them off to paint the yellow.
This needed several coats with sanding in between them.
And here is the finished prop. The whole gun had a wash of runny black paint to add a grime layer. this darked the yellow and gathered in all of the recesses to give a used and aged look. I also bought some leather to cut into a strip and wrap around the area in front of the trigger.
You can see the D-ring here.
Top view. Although the gun looks huge from the side it is actually quite narrow.
Left side.
These photos were taken juat after I finished assembling the prop and you can see that my hands are still covered in paint.
Here it is with the torch on and the LEDs too. Unfortunately 2 of the lasers failed just as I was assembling it so I had to make do with LEDs. A shame as they looked amazing.
Here is the gun rotated.
And from the side.
A video of the gun working is here:
http://www.youtube.com/watch?v=wJAT-_C_Nl0